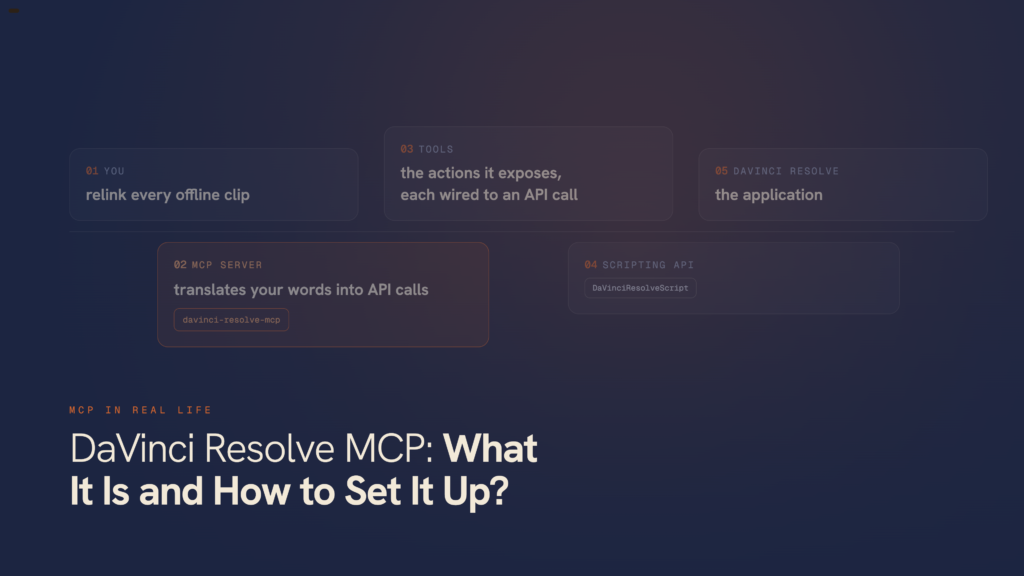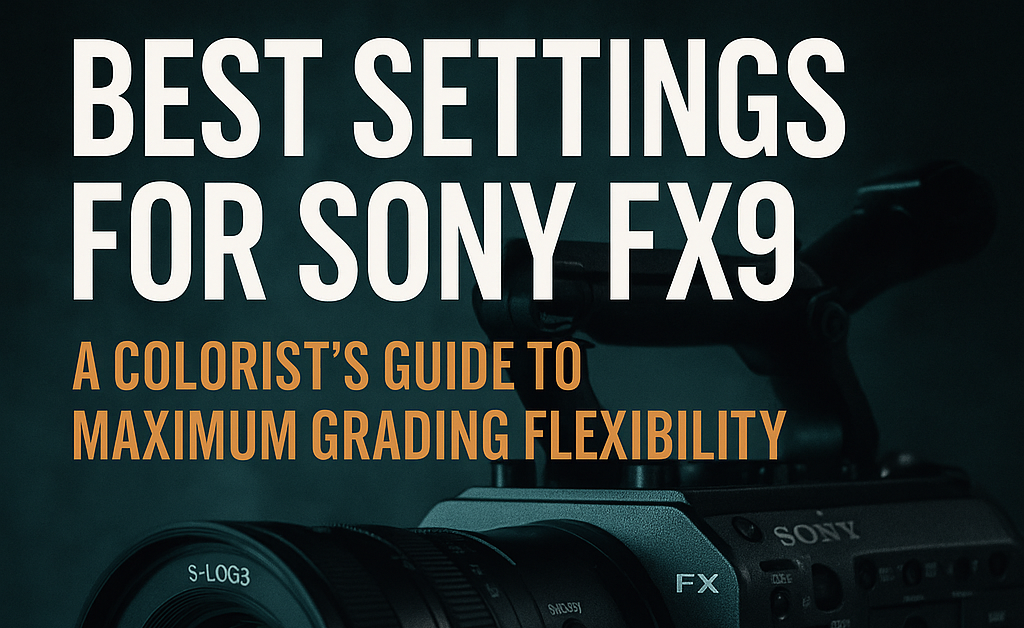
Best Settings for Sony FX9
If you’re using the Sony FX9 and want maximum flexibility in post-production color grading, your recording settings matter just as much as your lens choice. Whether you’re filming a documentary, branded content, or short-form storytelling, here are the best settings for Sony FX9 to ensure your footage grades cleanly and holds up across all platforms – from festival DCPs to fast-turnaround social cuts.
- Codec: XAVC-I (Intra-frame)
- Container: MXF
- Resolution Options:
- UHD (3840×2160) – 4K Ultra HD, standard for broadcast and online platforms
- DCI 4K (4096×2160) – Full 4K cinema resolution for theatrical and narrative workflows
- Framerate: 50p or 60p for B-roll (gives you slow-mo flexibility)
- Bit Depth & Chroma: 10-bit 4:2:2
- Data Rate: Minimum 240Mbps at 24FPS
Why XAVC-I?
✅ All-intra compression = each frame is encoded individually – better for fast motion and detailed grading
✅ 10-bit 4:2:2 allows clean keying, smooth skin tones, and higher-quality grading passes
✅ More robust than Long-GOP (XAVC-L), especially during handheld, action, or complex color correction
- Shooting Mode: Cine EI (Project → Base Setting → Shooting Mode)
- Gamma Curve: S-Log3
- Color Space: S-Gamut3.Cine (Project → Cine EI Setting → Color Gamut)
Why This Matters:
🎞️ S-Log3 delivers high dynamic range and protects highlights in challenging lighting
🎨 S-Gamut3.Cine mimics cinema color spaces, giving you more creative range in the grade
💼 Widely supported in DaVinci Resolve, Avid, and Premiere Pro for consistent workflows
🔗 Sony S-Log3 White Paper (PDF)
🔗 Netflix Camera Production Guide – FX9 Section
Exposure & Monitoring
- Middle Gray: Expose at ~41% IRE on waveform monitor (per Netflix FX9 guide)
- Dual Base ISO: ISO 800 and ISO 4000 (Shooting → ISO/Gain/EI → Base ISO)
- Monitoring LUTs: Use Rec.709 LUTs for on-set viewing only – never bake into recording
- Tooling: Trust waveforms and zebras over how the image “looks” on screen
Tip: Set zebras to 41% for middle gray, 70% for skin tone, and keep highlight roll-off clean. Always expose for the LOG signal, not the LUT preview.
Perform these daily for clean image capture:
- Auto Black Balance (ABB): Shooting → Auto Black Balance → Execute when camera reaches operating temp
- Auto Pixel Restoration (APR): Technical → APR → Execute to map out hot pixels
If ABB and APR don’t resolve dead pixels, send the camera to Sony for manual RPN (Remapping Pixel Noise) correction.
- Use CFexpress Type B cards for reliability and sustained write speed
- Label cards clearly with scene/roll info
- Record a color checker or gray card at the start of each lighting setup – essential for consistent grading later
- Record pre-roll (3–5 seconds) before every take – helps with audio sync and avoids cutting off action
- Backup all media daily – double-verify your DIT or wrangler has a clean copy on two drives
Quick Checklist for Your Camera Team
- ✅ Codec – Set to XAVC-I, 10-bit 4:2:2, MXF, UHD or DCI 4K
- ✅ Gamma & Color – Cine EI mode, S-Log3 + S-Gamut3.Cine
- ✅ White Balance – Lock manually per scene (no auto white!)
- ✅ Exposure – Middle gray at ~41% IRE
- ✅ Color Reference – Frame gray card or color checker on every lighting change
- ✅ Framerate – Use 50p or 60p for B-roll when in doubt
- ✅ Labeling – Clear card names and consistent file/take naming
- ✅ Pre-Roll – Roll 3–5 seconds before action
- ✅ Monitoring – Rec.709 LUTs for preview only; never baked in
- ✅ Sensor Maintenance – Run ABB and APR once camera is warmed up
- ✅ Daily Backups – Two copies minimum, with logs
Colorist Tip
If you’re mixing FX9 footage with Canon, DJI, or other cameras, normalize everything into DaVinci Wide Gamut / Intermediate using Color Space Transforms. This avoids LUT conflicts and ensures color consistency across brands.
For Sony FX9 in DaVinci Resolve:
- Input Color Space: S-Gamut3.Cine
- Input Gamma: S-Log3
- Output Color Space: DaVinci Wide Gamut
- Output Gamma: DaVinci Intermediate
📍 Tip: Set your CST in Group Post-Clip or Timeline node for clean creative grading in the clip node tree. This keeps everything modular and reversible.
Sony Look Profiles Summary, Summary of each Look Profile
Sony offers several Look Profiles designed to support a range of color grading workflows. Below is a short description of how each one affects the digital negative.
1. LC-709
Output tone curve is low contrast video tone. Highlight is lightly compressed and easy to expand by
grading. Shadow detail is also lightly compressed. Color reproduction produces better skin tone. Total
color is less saturated 709 to provide more room for color grading.
2. LC-709TypeA
This Look Profile is different version of “LC-709”. This profile is simulated conventional digital camera
such as Sony HDW-F900 and Alexa. Skin tone is slightly different with LC-709. Mid tone contrast is the
same as “LC-709”. Black has some offset to keep compatibility with conventional cameras. Total color
is less saturated 709 to provide more room for color grading.
Before (S-Log2/S-Gamut) After (Look Profile)
3. SLog2-709
Total color is less saturated 709 to provide more room for color grading. Tone curve keeps S-Log2. This
Look Profile is suitable for people who have good experience to handle S-Log2 directly.
4. Cine+709
This profile emulates film color. Nega-film and Posi-film are combined one and applied tone for TV
production. This Look Profile is designed monitoring use. If you want to grade based on this Look Profile,
you should be set this Profile as output LUT in the grading system. This means grading parameter
should be applied S-Log2/S-Gamut, and then Profile is applied after that.
(Source: Sony Look Profiles Summary (PDF file))
The Sony FX9 is a powerhouse – if used with post in mind. Stick to these settings and you’ll end up with footage that grades beautifully, survives multi-version delivery, and holds up under agency review or theatrical projection.
Want this guide as a downloadable PDF for your set? Or need a printable Camera Prep Checklist for the DP or 1st AC?
Reach out and I’ll send you one.
Change Log:
2025-07-09
- Sony Look Profiles Summary, Summary of each Look Profile added.
How much of your week goes to work that doesn’t need you?
Relinking, renames, conform, the same delivery spec for the tenth time. FORGE learns how your studio works and takes them off the floor, so your hours go to the work that needs a person in the chair. First call is free – 30 minutes, questions, no pitch.